Introduction
My Land Rover's main role in life is to carry mountain bikes around. Unfortunately, since I live in Cambridge, getting to anywhere with mountains means a long journey, usually on the motorway. Series Land Rovers were never designed for high-speed motorway driving. They're geared quite low, which means that, although they're capable of speeds in excess of 60mph, it's not generally considered to be a good idea for long periods. The engine is right up near the top of its rev range at those sort of speeds, and the noise is incredible.
The traditional solution to the problem is to fit an overdrive, which I did soon after I got the vehicle. The most common overdrive, the Fairey, is, shall we say, not up to the same robust standard as the rest of the transmission. After the third rebuild of my (old, and second-hand) overdrive, I was looking for a different solution.
For reasons I've written about elsewhere (on the gearbox page) I'd already taken my Land Rover's transmission apart. While it was spread around my workshop in hundreds of pieces, it occurred to me that now was the ideal time to change the gearing in the transfer box using the kit from Ashcroft Transmissions. This permanently raises the gearing in high ratio by roughly the same amount as the overdrive does, whilst leaving low ratio unchanged. It doesn't increase the mechanical complexity of the transmission, because it just replaces the existing high ratio gears in the transfer box. The only downside is that all the high ratio gears are permanently increased, so it might be necessary to use low box a little more often than before.
What's in the kit?
Ashcroft were prompt in supplying the kit, which consists of a new set of gears and a refurbished transfer box casing. The new casing is required because the new gears, being different sizes to the old ones, need the intermediate shaft to be in a different place. A gearbox gasket set is also included.
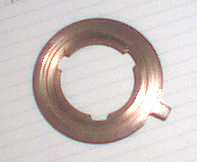
Just so you can see what you're replacing, here's a picture of the old gears from inside my transfer box.
![]()
On the left is the output gear, in the middle the intermediate gear, and on the right the input gear. The input gear looks a bit grotty because it's been sitting in a cardboard box for several years while the overdrive has been fitted: it's the one that the overdrive replaces.
Fitting
Fitting the new gears simply involves reassembling the transfer box with them in place rather than the old ones, a process that's well documented in both the Land Rover and Haynes workshop manuals. There are a few handy hints which I'll pass on, however:
See the gearbox page for the tools you'll need. Especially important is Special Tool 600300, for torquing up the castle nut on the end of the gearbox output shaft.
Because the new transfer casing has been modified to put the intermediate shaft in a different place, the thrust washer at the back (well, the engine end) of the intermediate shaft doesn't naturally sit in the right place like it would with a standard casing. Ashcroft helpfully glue one into position in the right place, so don't do what I did and knock it off. Assembling the intermediate shaft is a lot less fiddly with it glued in.
Here's a picture of the thrust washer. You'll probably want to order one (part number 521328) to replace the thrust washer at the other end of the intermediate shaft as well, just for good measure.
Don't put the handbrake backplate back on until you've completely reassembled the transfer box. I did, because I thought it would save some time while I waited for some final parts to arrive, but I quickly discovered that it's impossible to put the intermediate shaft in because the handbrake backplate gets in the way.
You'll need shims for the intermediate shaft (part number 561197). My original transfer box didn't have any shims, so I thought I wouldn't need many. In the end it turned out that I needed at least half a dozen of them to get the endfloat down to the correct 0.008" or thereabouts. Order lots.
The intermediate shaft is quite fiddly to insert all the way, but persevere and jiggle things around and it'll go eventually. It should insert far enough so that the notch into which the rectangular retaining plate fits is flush with the outside of the casing.
When dismantling the transfer box to fit the new high ratio output gear in, the Haynes manual advises removing the circlip which holds the front output bearing in, and then driving out the bearing via the shaft. It also advises putting the castellated nut back on to the shaft (the one which normally holds the handbrake/output flange in place) to avoid damage to the threads. Well, having been out to buy a suitable pair of circlip pliers, made myself a "suitable tubular packing piece" as required by the Haynes instructions, and destroyed the castellated nut whilst whacking it, I discovered that there's no need to remove that bearing at all! Ashcrofts have already thought of this one, and in the kit there's a bearing race already inserted into the right place in the new transfer casing.
With the couple of inches of movement available after the rear output bearing has been removed (which is much easier than removing the front one), it's possible to move the front bearing's inner race along the shaft far enough to get a pair of circlip pliers in and remove the circlip which holds the high ratio gear and thrust washer. Wiggle the circlip along the shaft a bit, and soon you can withdraw the shaft all the way through the inner bearing race and both gears. No problem. It's equally easy to reassemble it this way.
To try and illustrate what I'm talking about (I did take loads of photos but accidentally deleted them. Grrr.) here's a picture of my transfer casing as dismantled. On the left you can see the hole for the output shaft bearing, the bearing race itself and circlip having been removed and artistically placed around the hole. There's no need to do this at all.

Don't forget that if you're removing and refitting the transmission in its component parts, you can't refit the transfer box's intermediate shaft until the transfer box and gearbox are screwed back together. This means a rather fiddly operation on your back under the vehicle. Be patient, especially when you keep having to take it out again to add more shims.
The most tedious part of the operation is transferring all the little studs and pegs from the old transfer casing to the new one. The only ones which come prefitted are the big fat ones for the mounts to the chassis. It just takes a fair while with a Mole wrench, soft jaws and a blowtorch to do the job.
Once everything's back together, reconnect the propshafts and refill the gearboxes with oil. Then drive!
Results
So, what's the vehicle like to drive with the modification fitted? I've read articles about this which say the usual glib things about reduced noise, improved fuel economy, reduced engine wear, and so on, but they all say that, don't they?
The most noticeable thing is that the vehicle is much quieter. It's possible to hold a conversation in the cab without yelling yourself hoarse. A side effect of this is that driving on the motorway is much more relaxed: it doesn't feel like something's about to explode all the time.
The gear ratios do feel noticeably different. With the standard transmission (on 7.50 tyres) third gear is starting to run out at about 40mph. With the new high ratio, third is good to at least 55mph, which is ideal for accelerating on to fast roads without frantically changing gear all the time. In fact, for modern road conditions, the gears are much more suitable. First becomes useful instead of ridiculously low, second is spot on for slow town driving, and third is just right for trundling along at 30mph. I thought manoeuvring in first and reverse would be more difficult, but I can't tell the difference.
Any gain in fuel economy is rapidly wiped out by the discovery that it's now possible to cruise comfortably at hitherto unheard of speeds of, ooh, 65mph in the right conditions. So you do. Or at least I do. And I'd say that driving on dual carriageways and motorways is safer, because you're more able to be part of the flow of traffic rather than an obstruction.
Downsides? Sometimes I'd like a gear between third and top. Heavily laden, into a headwind, uphill on the motorway, can be a struggle when third is just too low and top is just too high. Of course, that's nothing that a bigger engine won't cure, but that's another project entirely.
I was warned by Ashcrofts when ordering the kit that pulling away on steep slopes might be more difficult. The only one I've had trouble with was a 1 in 4 (25%) gradient, on which I was just about able to pull away from rest but the engine was really labouring and it was clear we weren't going to get very far. On those occasions, low box is of course unchanged: I just changed down into low second and went up the hill as if it wasn't there. Well almost. Basically anything that doesn't have double chevrons on it on the OS map isn't going to be a problem.
Overall, I'm very pleased with the modification, and would recommend it to anyone who is daft enough to do many motorway miles in a Series vehicle, and isn't afraid of a transmission rebuild.
Chris Jones, 20 January 2003